首先,你必須是一位 Google Play 的開發人員。
若你沒有 Google 帳號可先註冊一個,這就不用我教了吧...
再點開以下網址課金成為開發人員。
https://play.google.com/apps/publish/signup/請準備好你的信用卡,並準備支付 25 元美金。
職業轉換成功後,就能開啟我們的 Visual Studio 專案準備產生 Apk ~
照著以下三個步驟做:
一、更改建置資料
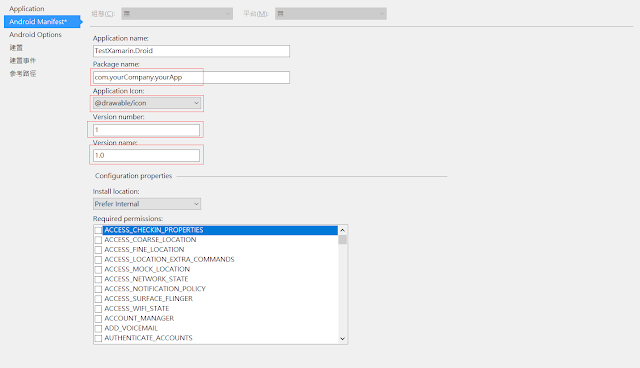
1. Droid 專案 右鍵 → 屬性 → Android Manifest → 更改:
- Package name:格式必須像 com.xxxx.xxxx 才能上架
- Application Icon :可以在 Android 專案底下的 Resources 的 drawable 資料夾發現 icon 圖檔
其他三個 hdpi, xhdpi, xxhdpi 都要一併更改 ( 關於 dpi 之後會有相關教學)
- Version number 和 Version name
1. Droid 專案 右鍵 → 屬性 → Android Manifest → 更改:
- Package name:格式必須像 com.xxxx.xxxx 才能上架
- Application Icon :可以在 Android 專案底下的 Resources 的 drawable 資料夾發現 icon 圖檔
其他三個 hdpi, xhdpi, xxhdpi 都要一併更改 ( 關於 dpi 之後會有相關教學)
- Version number 和 Version name
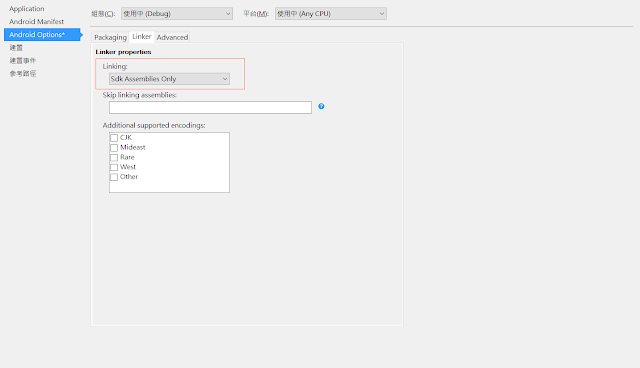
2. 同樣屬性 → Android Options → 更改建置組態為 Release, VS 會自動幫你取消勾選 Use Shared Runtime,
不要跟作者一樣傻傻的,一直更改打叉叉的組態下拉,建置後才發現選錯地方...
3. Android Options → Linker → Linking 更改為 Sdk Assemblies Only (此步驟能有效降低 Apk 大小)
4. 專案 右鍵 → 重建 <<<<<<<<<<<<< 不要忘記這步驟,很重要
二、更改 AssemblyInfo.cs
專案 右鍵 → 在檔案總管中開啟資料夾 → Properties 資料夾 → 開啟 AssemblyInfo.cs
將以下程式碼貼上去,忘記此步驟會被 Google Play 擋下
#if DEBUG
[assembly: Application(Debuggable=true)]
#else
[assembly: Application(Debuggable = false)]
#endif
三、產生 Apk
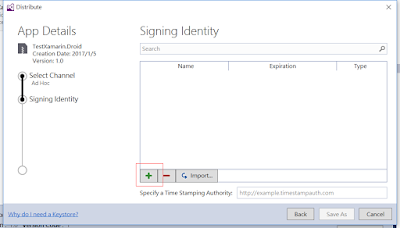
1. 專案 右鍵 → Archive (VS2017 正式命名為 封存) → 等待一下後 → Distrubute...
2. Ad Hoc ( VS 也支援直接發布到 Google Play,那又是另一個故事了 ) →
3. 新增 Keystore
5. 點選剛剛建立的 Keystore 後另存新檔
6. 最後,輸入 KeyStore 的密碼,當啷,生出 apk ~~
更詳細的教學或是要學第 三.2 步驟中直接發布至 Google Play 的方法可至 Xamarin 官網查看。
https://developer.xamarin.com/guides/android/deployment,_testing,_and_metrics/publishing_an_application/part_1_-_preparing_an_application_for_release/
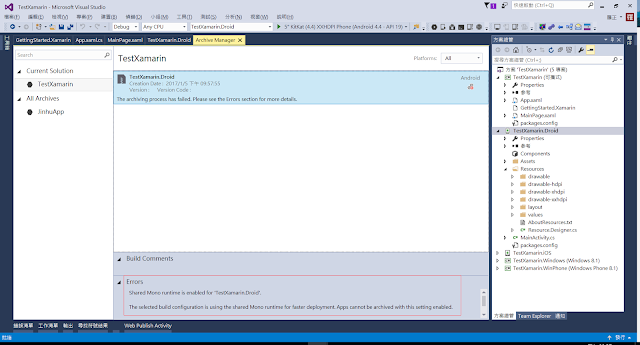
注意:若出現以下錯誤代表你的 Use Shared Runtime 未取消勾選
Shared Mono runtime is enabled for "xxx.Droid"... bra bra bra...


沒有留言:
張貼留言
注意:只有此網誌的成員可以留言。